
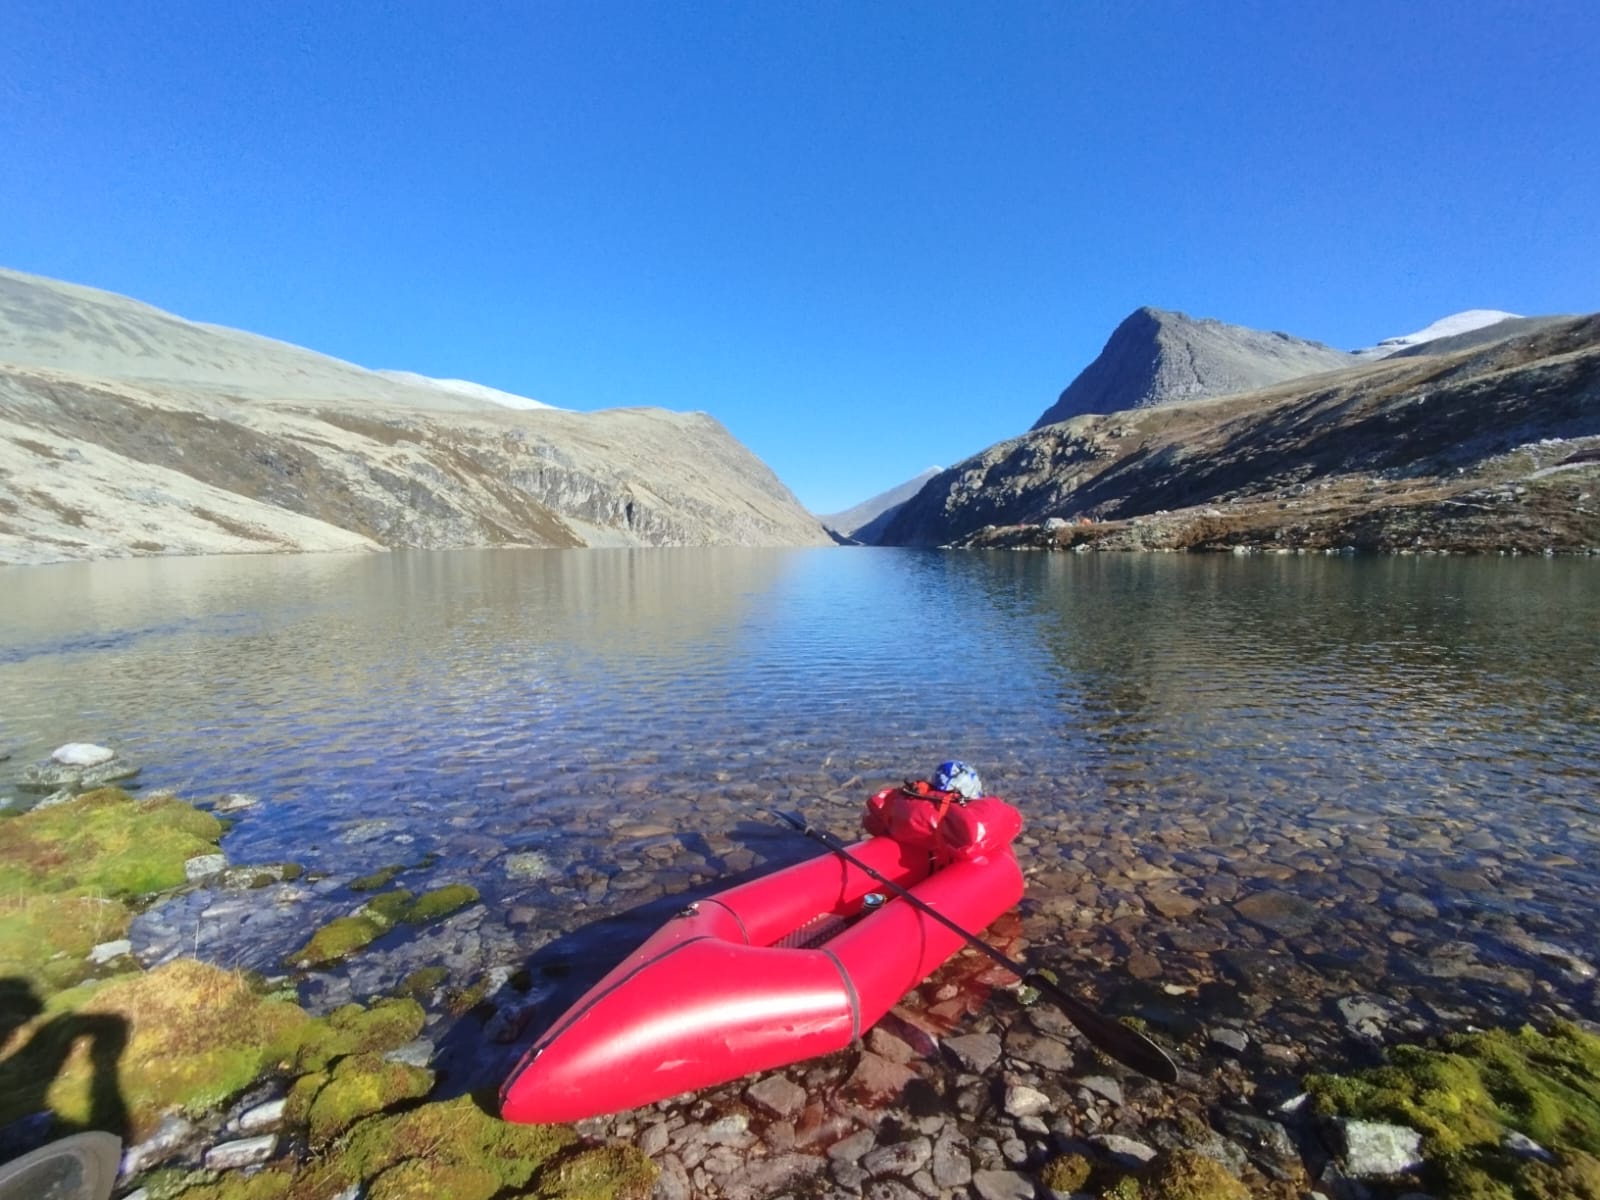
With a spot of good weather late into the season on the forecast we jumped on a train to this accessible hiking paradise in Norway. This is a great introduction to multiday packrafting with a moderately challenging hike into the put-in and some light whitewater action that will enable you to test both your setup and your paddling skills with a loaded boat.
Summary
- Difficulty: Entry level. With the kickoff in Rondvatnet lake to get you warmed up before the class I rapids of the Storula. The focus is definitely on scenery over white knuckle fun.
- Danger: Low for those with basic paddling experience.
- Put-in: Hike into the Rondvassbu hut along the gravel track from the park entrance parking lot. Take the western (and only route) to the ferry dock on the northern shore of Rondvatnet and that’s where your paddle begins! (GPS: 61° 54′ 35.18″ N, 9° 48′ 12.05″ E)
- Takeout: There’s a pretty obvious stop here in the major waterfall of the Storelfossen. Spectacular and definitely a must see but not from inside a raft. The river is class I till a few hundred metres before this which is the suggested takeout. (GPS: 61° 50′ 12.37″ N, 9° 42′ 42.47″ E)
- Distance: 11.5 km of paddling with a 13 km hike to the put-in and a 4 km hike out from the takeout.
- Time: Weekend trip with a night after the hike to the put-in and day 2 spent on the water.
- Route: GPX Downloads below
- Sleeping options: Tent and sleeping system for the appropriate season.
- Special gear: Packraft and all the necessary paddling gear. A solid 70l pack is generally needed for the paddling and hiking gear. The price you pay for doing two sports on one trip!
- Permits: Respect the wilderness and you’re good to go.
Overview
This is a great introduction to multiday packrafting with a moderately challenging hike into the put-in and some light whitewater action that will enable you to test both your setup and your paddling skills with a loaded boat.
Once you’ve got a few day trips packrafting under the belt, you’re generally comfortable with all the necessary gear for a day or half day spent on the water. Inflation bags, multi-piece paddles and the packraft itself all need a little bit of getting used to.
The prospect of hiking into your river and camping overnight introduces a few more aspects to wrangle with as you now bring overnight camping gear into the equation. One of the more important questions to ask is what gear to bring and how to pack it all so that your hike won’t be a desperate trudge and your time on the water won’t be more stressful than necessary.
Photos


General Packraft Gear Advice
There is a lot of gear and packing advice out there but I believe in general concepts that everyone can then apply to their personal circumstances.
- Keep it light – with the addition of packrafting gear to your hiking setup you’ve got to be fairly ruthless in what you bring along. The idea is to enjoy the hike and for it not to be a gruesome trudge. The weather relevant layers and sleeping gear need to come along but maybe that 700 page copy of Lord of the Rings can be left at home.
- Paddling gear pack setup – depending on your hiking pack there are a bunch of ways of packing in your paddling gear. Generally it goes on the outside with the paddle in pieces in either the main back or side mesh compartments. The big tip here may be logical for many but do a test pack at home if you can to make sure there is a reasonable packing configuration. Small refinements can and will be made as you go along the trip.
- A bit of cord goes along way – adding 3mm cord with a cord lock to the loops you’ll find on most backpacks makes a great place for the paddle and often your PFD as well.
- Pack size – as much as it hurts to say your 30 litre fastpack is not quite going to cut it. For colder weather camping (ie around 0 degrees) I’m looking at a 65 litre pack with cord holding in my PFD and paddle on the back.
- Packraft tiedown – if your hiking gear isn’t securely attached to your packraft for the paddle down it’ll be a lot of frustrating stops at best and an expensive trip to the hiking store at worst. For those with an airtight zipper in their packraft, well we’re jealous. For those without, using bungee cord tiedowns is my best suggestion. If your preparation isn’t complete chaos try give it a test before leaving home as it can really change the nature of the paddle.
-

Malachite – Trail Running Rain Jacket
From R2,900 -

Hoopoe – Adventure Jacket
From R3,500


Paddling the river
As mentioned in the intro its a class I paddle on the river with maybe a section or two that may touch class II depending on the flow. For people with a few packrafting day trips under their belt it shouldn’t do more than keep it interesting and get a smile on your face. The most technical section is just before the bridge over the Storula at the parking lot which is also the start of the hike (61° 50′ 21.59″ N, 9° 43′ 55.93″ E). This is also the traditional put-in for whitewater kayakers and the rapid running under the bridge would be a significant challenge for an experienced paddler with a loaded packraft. My advice is to portage the bridge section.
Other than that section it’s generally light whitewater that will allow you to get to grips with paddling a loaded packraft in moving water. It definitely does feel like a different beast with the loss of a bit of the packraft’s nimbleness and turning speed. But with little to no consequences of failure this is a great little section to get some practice and have an amazing weekend out in the wilderness to boot.


Leave a Reply